Email Templates
On this page we will tell you about Email Templates, what it is and how to use them in FT CRM.
📨 What is an Email Template?
An email template is a preformatted and/or prewritten email that you can use as a base when creating new emails. This allows you to easily write and create emails at a high pace.
Incorporating placeholders into your email templates allows you to re-use the same templates over and over again. This means, no need for hundreds and hundreds of emails cluttering your workspace.
We will also introduce some advanced components and capabilities of the email template builder and the awesome benefits of having your email templates inside FT CRM, introducing:
FT Conditions
Inside our email templates and content blocks, we can include conditional tags that allow you to create dynamic content based on segmentation. Read more.
Content Blocks
We can build email templates using Content Blocks. A Content Block corresponds to a section of an email, for example: logo, header, banner, footer etc. We can build up an email quickly and easily using several reusable Content Blocks. Read more.
How to set up an Email Template in FT CRM
📎 Adding a Template
In the menu, navigate to CRM, and under Resources you can find Email Templates.
Add a new Email Template with a single click and give it a suitable name before saving.
Add a new Email Template and name it
Add a new Email Template and name it
🧠 Note: Once you've finalised your email template you'll find it through the given name when creating your email send out. So, make sure to give a unique/descriptive name of your email template so that you easily can find it.
➕ Adding a Version
The next step is to add a version to your new template.
Email Templates are based on HTML. So, if you already have an Email Template from before you can just copy and paste the code into your newly created version. Or you can even drag and drop an HTML file directly into the code editor.

Adding a version
Adding a version
You can add as many versions as you want within your template, however, only one version can be active at a time. With a single click, you can make another version active:

Changing the active version
Changing the active version
This feature allows you to change into a new Email Template design without having to go through any of your set-up Activities. Just add your newly designed Email Template as a new version and activate it when you want to make the switch.
What you have to keep in mind, is that the exact same placeholders and no additional placeholders can be added into the new template for this seamless switch. If there is any difference in the placeholders, you will need to go through your email Actions to fill in any new fields.
🔡 Placeholders and how to use them
As mentioned before, using placeholders in your Email Templates allows you to re-use the same templates over and over again.
To add a placeholder into your Email Template you simply need to add two curly brackets on each side of a unique variable. Examples:
{{MainBanner}}
{{Header}}
{{Image}}
{{CTA}}
You can use any variable for your placeholders, as long as they're surrounded by the curly brackets and don't include any spaces or special characters. However, we suggest that they are kept as logical as possible in order for the set-up of your email to be as straightforward as possible.
Unless you want any repetitions in your email, make sure that all the placeholders are unique within the template.
From square brackets to curly brackets
Initially, placeholders were created by using single square brackets.
Example: [Placeholder]
As an improvement, we implemented a new way of creating placeholders, with double curly brackets.
👉 If you've currently set up your placeholders with square brackets, we highly suggest updating these placeholders with double curly brackets for an overall smoother experience.
Any added placeholder, in your Email Template, will show up as unique fields in your email Action with the related placeholder as a title. Whatever you enter into these fields will then replace the placeholder in the template.
We recommend that you continue reading the next sections in order to get an understanding of the advanced features we have inside the Email Template builder. Or move on to How To Create An Email to learn how to set up an email with your new template.
🎁 Best Practice
Handling large chunks of HTML can be tricky. We have some functionalities that help to mitigate problems that might arise. Let's take a look at what they are and how to use them:
Autosave
Enable the autosave feature on your email template in order to automatically save progress, every few seconds, as you work.

Autosave
Autosave
🧠 Note: Autosave will be disabled when the Email Template is in use in active activities or if you have errors in the HTML.
Template in Use
Before you make any changes to your Email Template, check out if it is currently in use in any active Activities.

Template in use
Template in use
You can see from the above example, that the template is currently being used by 9 activities. Open the email template to see the full list of activities.

Email template - used by activities
Email template - used by activities
HTML Errors
Any errors in your HTML will be displayed along the top bar inside the Email Template. You can also find a red 'X' inside the code editor next to the line containing the error.

HTML error
HTML error
Broken HTML: If your Email Template has problems with the HTML code, we will display an error message inside the code editor, in the email preview and in the QA portal to alert you.
However, we won't stop you from using the broken template.
Having broken HTML code inside your template will:
- Reduce the number of features you can take advantage of inside the template builder, such as inline editor and all styling buttons
And
- May result in the final email not displaying correctly ☹
Overview of Content Blocks & Conditions used
Tip: Get an overview of the conditions and content blocks in use in your template!
Select the message at the bottom-right of the code editor. A new panel will open to show a summary of all the condition segments and content blocks in use. See below:
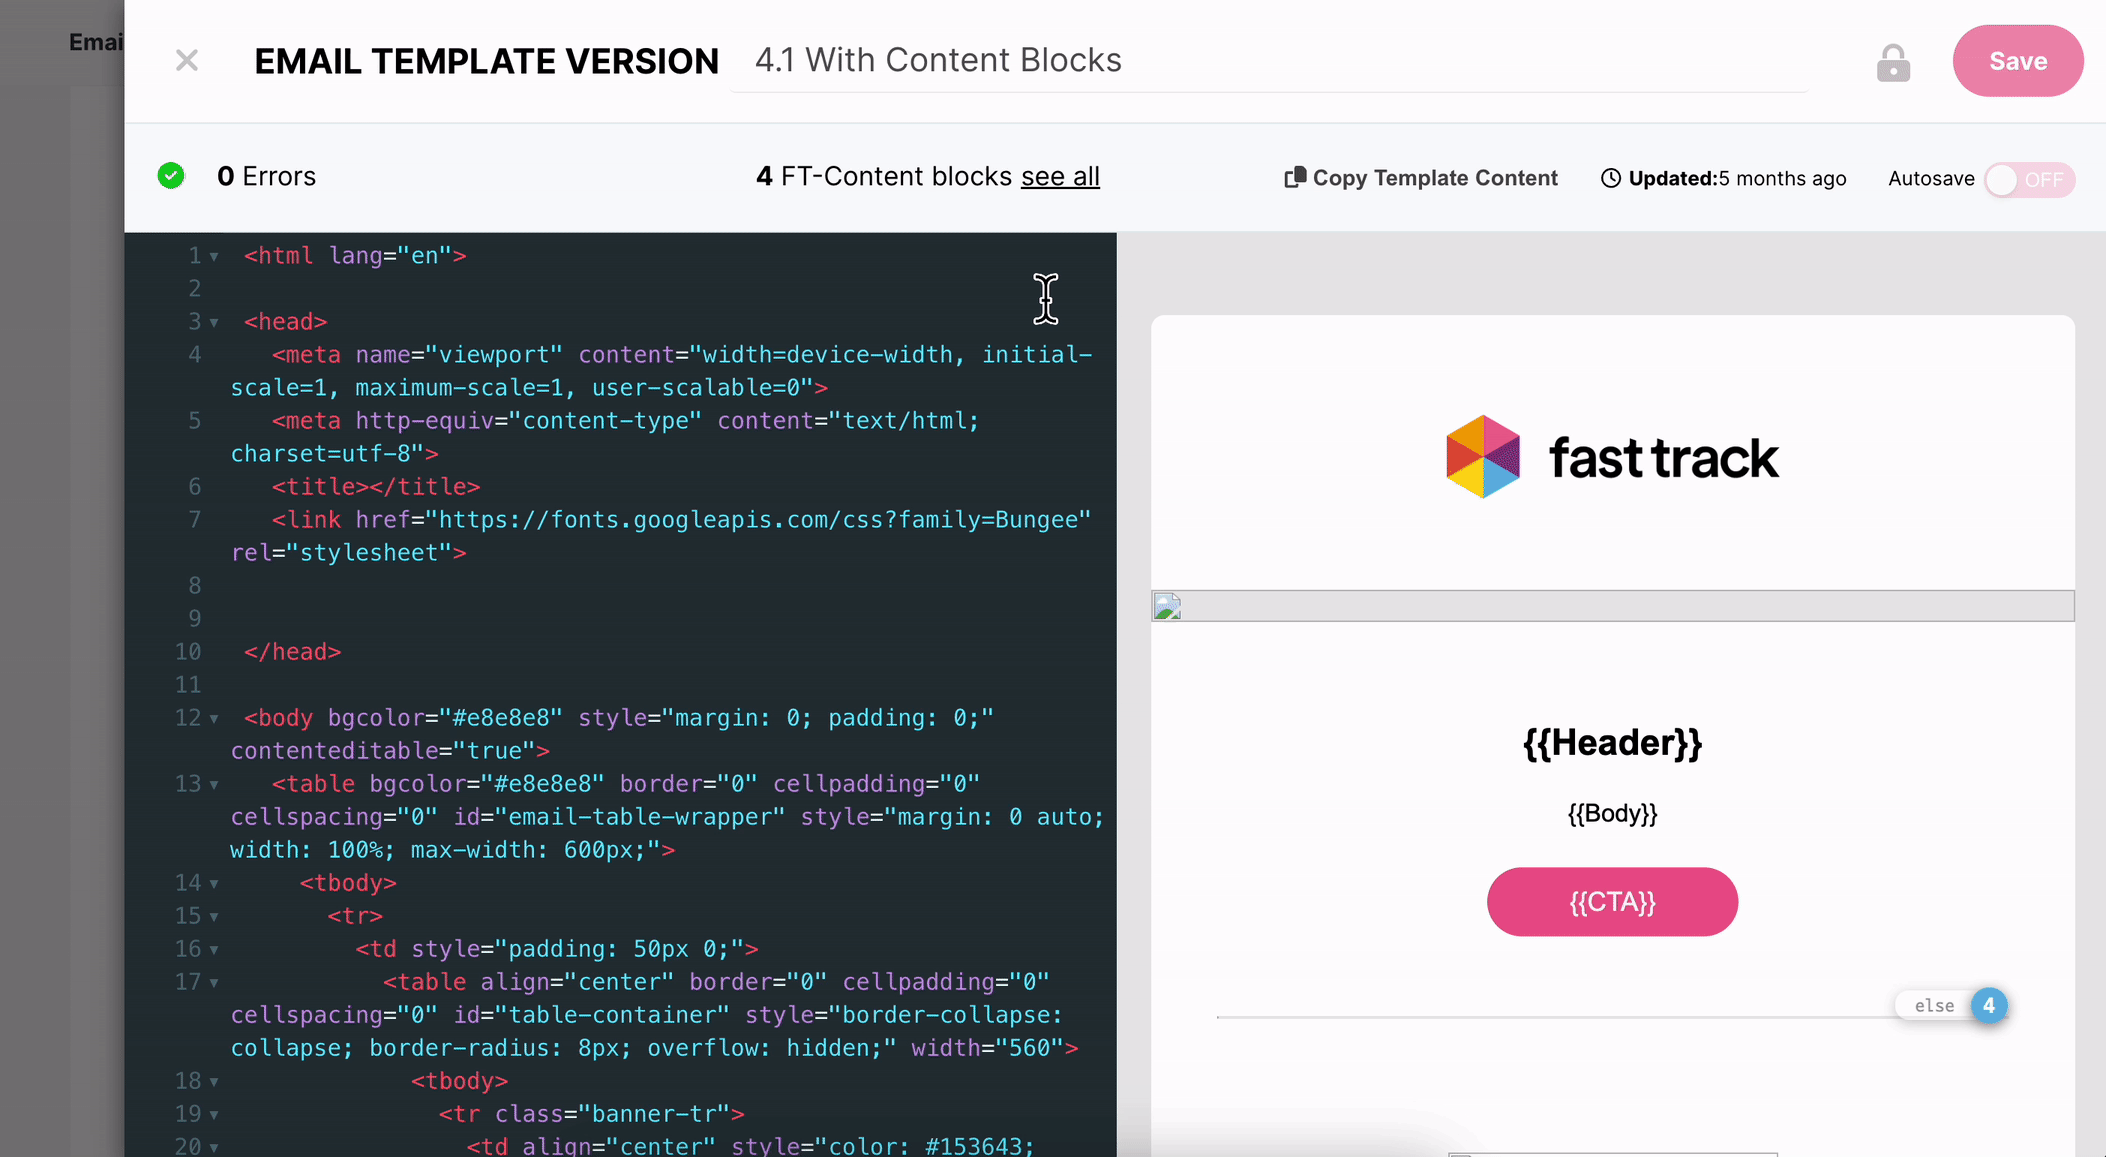
Overview of Content Blocks & Conditions inside an Email Template
Overview of Content Blocks & Conditions inside an Email Template